S3-Compatible Object Storage
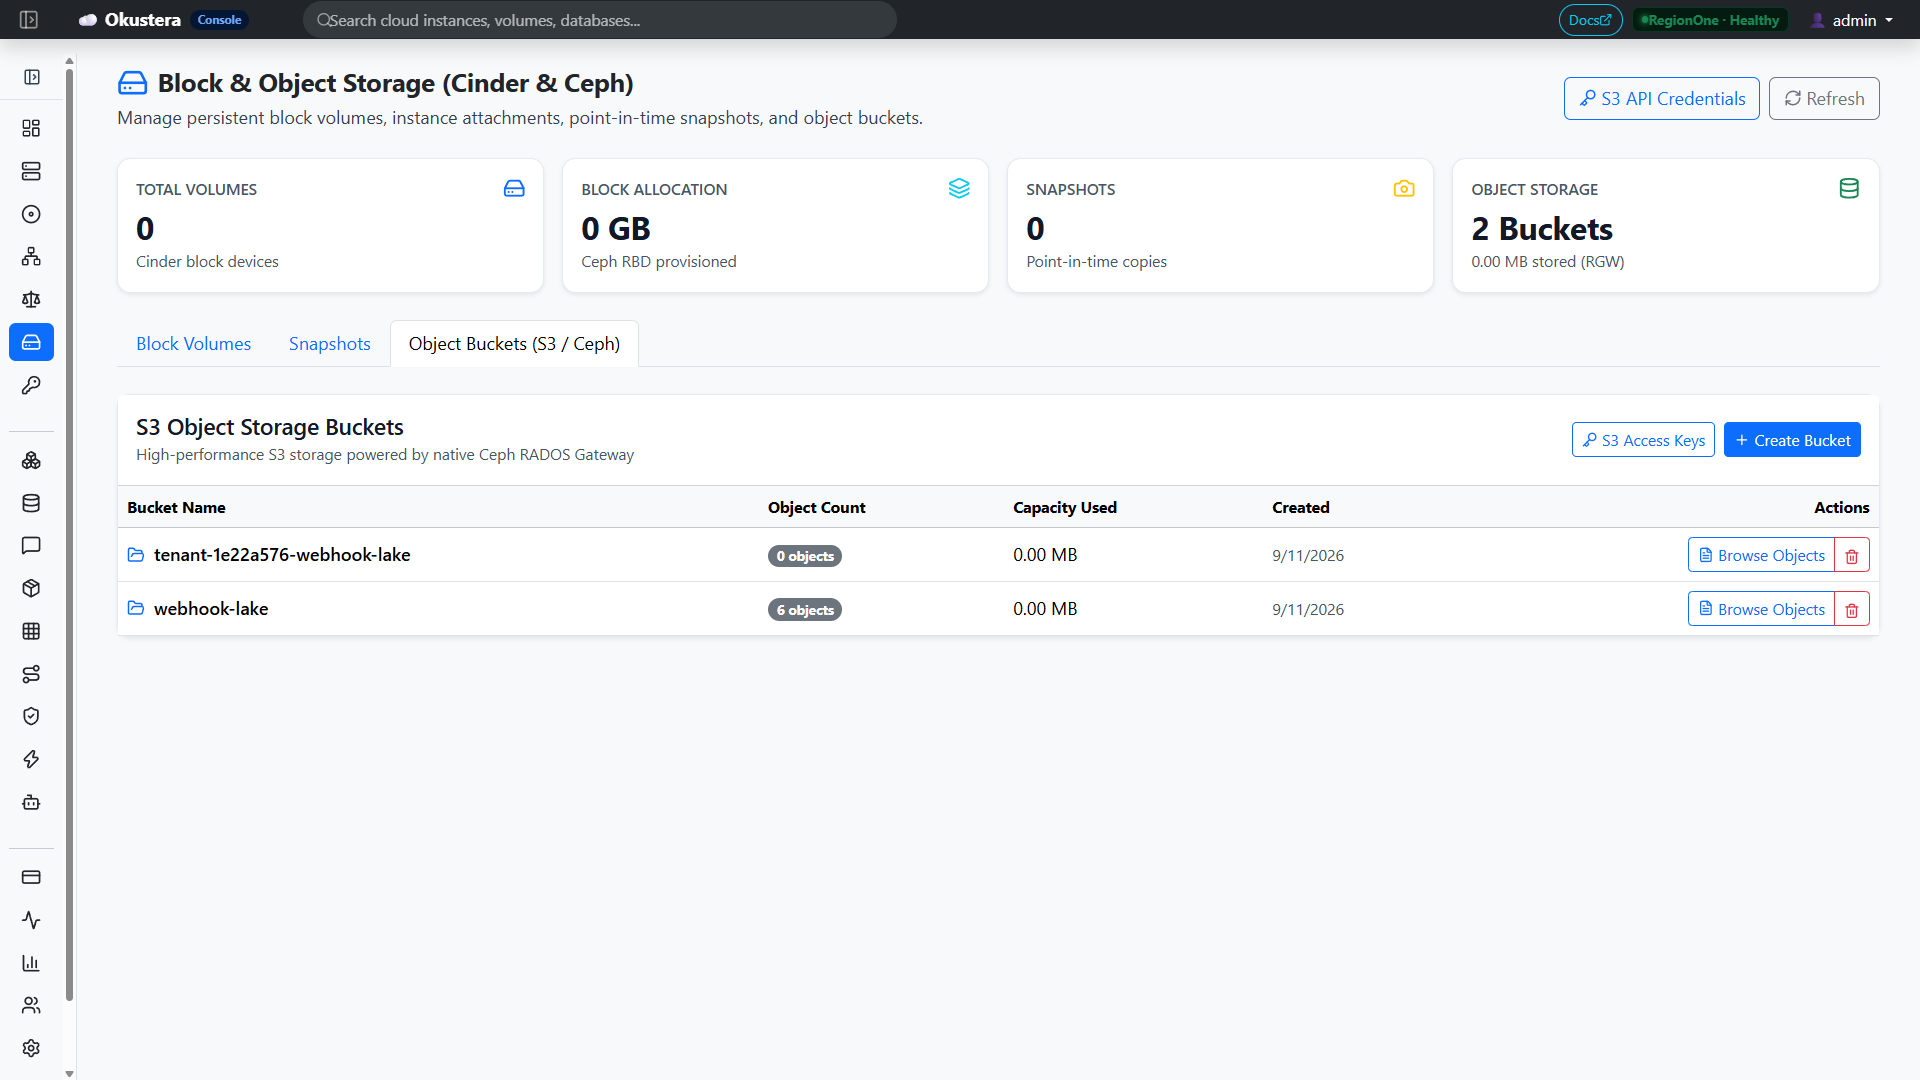
Okustera Object Storage provides enterprise-grade, high-availability storage accessible via standard Amazon S3 REST APIs, powered by Ceph RADOS Gateway (RGW).
It provides horizontal scalability, zero egress penalties, automated object versioning, lifecycle expiration policies, and seamless compatibility with the Okustera Cloud Portal, AWS CLI, AWS SDKs, and Terraform.
Key Capabilities
- 100% S3 API Compliance: Works out of the box with the standard AWS CLI, AWS SDKs (Go, Python
boto3, Node.js, Java), Cyberduck, and Rclone. - Interactive Cloud Portal Object Browser: Create buckets, browse directory prefixes, drag-and-drop upload, and download files directly from your browser.
- Self-Service Credential Provisioning: Generate S3 Access Key / Secret Key pairs on demand per tenant project or service account.
- Presigned URLs: Securely grant temporary read or write access to third-party clients without exposing credentials.
- Server-Side Encryption (SSE-KMS): Automatically encrypt objects at rest with tenant-specific keys managed via OpenStack Barbican.
- Multipart Uploads: Efficiently stream multi-gigabyte or terabyte files with parallel chunk uploads and automated resume.
Managing Object Storage in the Cloud Portal
The Okustera Cloud Portal (/objects) includes a complete graphical object management suite:
1. Generating S3 Access Credentials
Before connecting with CLI tools or SDKs, generate your S3 credentials:
- Navigate to Storage $\to$ Object Storage (
/objects). - Click Credentials tab $\to$ Generate S3 Credentials.
- The portal creates a new access key and secret key:
- Access Key: e.g.,
AKIA...(Public identifier) - Secret Key: e.g.,
wJalrXUtnFEMI...(Save this immediately, as the secret key cannot be retrieved again).
- Access Key: e.g.,
2. Creating a Bucket
- Click Create Bucket.
- Bucket Name: Must be globally unique, lowercase, and DNS-compliant (e.g.
company-assets-prod). - Access Control (ACL):
private: Only authenticated project members and signed URLs can access objects (Recommended).public-read: Anyone on the internet can read/download objects via direct URL (Useful for static website assets).
- Click Create.
3. Uploading & Browsing Objects in the Browser
- Click into your bucket name to open the Object Browser.
- Create folders to organize your hierarchy (e.g.,
uploads/,invoices/). - Drag and drop files from your desktop directly into the browser to start an instant upload.
- Click any object to view its size, MD5/ETag checksum, MIME type, and last modified date.
4. Generating Presigned Download URLs
To share a private object with an external client for a limited time:
- In the Object Browser, locate your file and click Get Presigned URL.
- Select an Expiration Window (e.g.,
15 minutes,1 hour,24 hours). - Click Generate Link and copy the temporary signed URL. Anyone with this link can download the object directly without needing an account.
Accessing with Python (boto3)
import boto3
from botocore.client import Config

s3 = boto3.client(
    's3',
    endpoint_url='https://s3.okustera.com',
    aws_access_key_id='<YOUR_ACCESS_KEY>',
    aws_secret_access_key='<YOUR_SECRET_KEY>',
    config=Config(signature_version='s3v4'),
    region_name='default'
)

# Upload an object
s3.upload_file('/tmp/data.csv', 'company-assets-prod', 'exports/2026-data.csv')

# Generate a 1-hour presigned download URL
url = s3.generate_presigned_url(
    'get_object',
    Params={'Bucket': 'company-assets-prod', 'Key': 'exports/2026-data.csv'},
    ExpiresIn=3600
)
print("Presigned URL:", url)
Server-Side Encryption with OpenStack Barbican (SSE-KMS)
Okustera Object Storage features native Server-Side Encryption with Key Management Service (SSE-KMS) powered by OpenStack Barbican and Ceph RADOS Gateway envelope encryption:
Enabling Bucket Default Encryption
Enforce default SSE-KMS encryption across an entire bucket:
from botocore.config import Config
import boto3

s3 = boto3.client(
    "s3",
    endpoint_url="https://s3.okustera.com",
    aws_access_key_id="<YOUR_ACCESS_KEY>",
    aws_secret_access_key="<YOUR_SECRET_KEY>",
    region_name="RegionOne",
    config=Config(signature_version="s3v4", s3={"addressing_style": "path"})
)

BARBICAN_KEY_UUID = "<YOUR_BARBICAN_KEY_UUID>"

# Configure default bucket-level SSE-KMS
s3.put_bucket_encryption(
    Bucket="company-assets-prod",
    ServerSideEncryptionConfiguration={
        "Rules": [
            {
                "ApplyServerSideEncryptionByDefault": {
                    "SSEAlgorithm": "aws:kms",
                    "KMSMasterKeyID": BARBICAN_KEY_UUID,
                }
            }
        ]
    }
)
Object Deduplication & Storage Architecture
Okustera Object Storage is built on Ceph RADOS Gateway (RGW) backed by NVMe BlueStore storage pools. Deduplication and data reduction are handled across multiple tiers:
Deduplication Characteristics
- No Inline Global Cross-Object Deduplication:
Ceph RGW does not perform automatic inline content-addressable deduplication across arbitrary
PutObjector multipart upload operations. If identical data is uploaded under different object keys or across different buckets, each object allocates independent RADOS chunks on physical storage. - Zero-Copy Metadata Cloning (
PutObjectCopy): When copying an object within the same zone using the S3 API (PutObjectCopyorUploadPartCopy), Ceph RGW performs a Copy-on-Write (CoW) metadata clone. It points the destination object manifest to the existing source data chunks in RADOS without duplicating physical bytes on disk. - Transparent Block Compression (BlueStore): At the physical storage tier, Ceph BlueStore performs transparent inline block compression (ZSTD / LZ4) on OSD chunks at rest. Highly repetitive data (e.g. database dumps, text logs, CSVs) is compressed automatically with 40%–70% capacity reduction.
- Client-Side Deduplication (Recommended for Large Backups): For backup systems, container registries, or large-scale file stores, deduplication is performed on the client side prior to upload. For example, Velero uses Kopia's Content-Defined Chunking (CDC) repository format to deduplicate snapshots before streaming unique chunks to S3.
- Cryptographic Multi-Tenant Isolation: Because each tenant encrypts data at rest using unique OpenStack Barbican SSE-KMS keys, identical data stored by different tenants produces completely different ciphertexts. Cross-tenant deduplication is cryptographically impossible and prohibited to eliminate side-channel timing leaks between tenants.
Behavior: Uploading Identical Objects (Same Tenant)
When a tenant uploads identical content, the storage and quota impact depends on whether the object is uploaded to different keys or overwritten under the same key:
Scenario 1: Same Content Uploaded to Different Keys
If a tenant uploads the exact same local file to two different keys (e.g. exports/data_2026.csv and archive/data_backup.csv) via upload_file or PUT, Ceph RGW stores both as separate objects. Storage quota is consumed for both.
❌ Inefficient: Uploading Raw Bytes Twice
# Consumes double network bandwidth and double storage quota in Ceph
s3.upload_file('/tmp/data.csv', 'company-assets-prod', 'exports/data_2026.csv')
s3.upload_file('/tmp/data.csv', 'company-assets-prod', 'archive/data_backup.csv')
✅ Optimized: Using Zero-Copy copy_object (CoW Clone)
Instead of re-uploading identical bytes, execute a copy operation within S3. Ceph RGW creates a metadata reference to the existing RADOS chunks in milliseconds with zero extra physical data consumption:
import boto3
from botocore.client import Config

s3 = boto3.client(
    's3',
    endpoint_url='https://s3.okustera.com',
    aws_access_key_id='<YOUR_ACCESS_KEY>',
    aws_secret_access_key='<YOUR_SECRET_KEY>',
    config=Config(signature_version='s3v4'),
    region_name='default'
)

# 1. Initial upload of source object
s3.upload_file('/tmp/data.csv', 'company-assets-prod', 'exports/data_2026.csv')

# 2. Perform server-side zero-copy clone (no client re-upload, no duplicate RADOS chunks)
s3.copy_object(
    Bucket='company-assets-prod',
    CopySource={'Bucket': 'company-assets-prod', 'Key': 'exports/data_2026.csv'},
    Key='archive/data_backup.csv'
)
With AWS CLI:
# Server-side zero-copy clone within the bucket
aws s3 cp s3://company-assets-prod/exports/data_2026.csv \
          s3://company-assets-prod/archive/data_backup.csv \
          --endpoint-url https://s3.okustera.com
Scenario 2: Overwriting the Same Key (Versioning Disabled)
By default, S3 buckets are created with Versioning Disabled (Unversioned). When a tenant uploads an object to an existing key:
- Ceph RGW replaces the metadata pointer for that key with the newly uploaded object.
- The previous data chunks in Ceph are unlinked and queued for background garbage collection (
radosgw-admin gc). - Storage quota only accounts for the latest uploaded object; space is not doubled.
Object Versioning & Lifecycle Policies
When Object Versioning is enabled on a bucket, every overwrite or re-upload to an existing key creates a new, immutable version identified by a unique VersionId.
[!IMPORTANT] Storage Quota & Billing Impact With versioning enabled, each version of an object is stored and retained independently. If you upload a 500 MB file 4 times to the same key with versioning enabled, your bucket retains 4 distinct versions totaling 2 GB of consumed storage until noncurrent versions are deleted or expired by a lifecycle rule.
1. Enabling Versioning on a Bucket
import boto3
from botocore.client import Config

s3 = boto3.client(
    's3',
    endpoint_url='https://s3.okustera.com',
    aws_access_key_id='<YOUR_ACCESS_KEY>',
    aws_secret_access_key='<YOUR_SECRET_KEY>',
    config=Config(signature_version='s3v4'),
    region_name='default'
)

# Enable versioning
s3.put_bucket_versioning(
    Bucket='company-assets-prod',
    VersioningConfiguration={
        'Status': 'Enabled'
    }
)
With AWS CLI:
aws s3api put-bucket-versioning \
    --bucket company-assets-prod \
    --versioning-configuration Status=Enabled \
    --endpoint-url https://s3.okustera.com
2. Uploading Multiple Versions to the Same Key
When uploading multiple times to the same key, each response returns a unique VersionId:
# Upload version 1
resp1 = s3.put_object(
    Bucket='company-assets-prod',
    Key='config/settings.json',
    Body=b'{"version": 1, "status": "active"}'
)
version_id_1 = resp1['VersionId']
print("Version 1 ID:", version_id_1)

# Upload version 2 (overwriting the same key)
resp2 = s3.put_object(
    Bucket='company-assets-prod',
    Key='config/settings.json',
    Body=b'{"version": 2, "status": "maintenance"}'
)
version_id_2 = resp2['VersionId']
print("Version 2 ID:", version_id_2)
3. Listing and Retrieving Specific Object Versions
You can list all historical versions of an object and retrieve any past version by its VersionId:
# List all versions for the key
versions_resp = s3.list_object_versions(
    Bucket='company-assets-prod',
    Prefix='config/settings.json'
)

for v in versions_resp.get('Versions', []):
    print(f"Key: {v['Key']}, VersionId: {v['VersionId']}, Latest: {v['IsLatest']}, Size: {v['Size']} bytes")

# Download the specific historical Version 1
old_version = s3.get_object(
    Bucket='company-assets-prod',
    Key='config/settings.json',
    VersionId=version_id_1
)
content = old_version['Body'].read().decode('utf-8')
print("Restored Version 1 content:", content)
With AWS CLI:
# List all versions
aws s3api list-object-versions \
    --bucket company-assets-prod \
    --prefix config/settings.json \
    --endpoint-url https://s3.okustera.com

# Fetch historical version
aws s3api get-object \
    --bucket company-assets-prod \
    --key config/settings.json \
    --version-id "<HISTORICAL_VERSION_ID>" \
    /tmp/restored-settings.json \
    --endpoint-url https://s3.okustera.com
4. Automated Version Expiration (Lifecycle Rules)
To prevent historical versions from consuming excessive storage quota indefinitely, configure an S3 Lifecycle Rule to automatically prune noncurrent versions after a specified number of days:
s3.put_bucket_lifecycle_configuration(
    Bucket='company-assets-prod',
    LifecycleConfiguration={
        'Rules': [
            {
                'ID': 'PruneHistoricalVersions',
                'Status': 'Enabled',
                'Filter': {'Prefix': ''},
                'NoncurrentVersionExpiration': {
                    'NoncurrentDays': 30  # Automatically delete noncurrent versions older than 30 days
                },
                'AbortIncompleteMultipartUpload': {
                    'DaysAfterInitiation': 7  # Clean up failed multipart chunks
                }
            }
        ]
    }
)
Declarative Management via Terraform
# 1. Provision S3 Bucket
resource "okustera_s3_bucket" "app_assets" {
  name     = "company-assets-prod"
  acl      = "private"
  quota_gb = 500
}

# 2. Provision S3 Credentials for Application Service Account
resource "okustera_s3_credentials" "app_creds" {
  name = "app-pipeline-s3-creds"
}

output "s3_access_key" {
  value = okustera_s3_credentials.app_creds.access_key
}

output "s3_secret_key" {
  value     = okustera_s3_credentials.app_creds.secret_key
  sensitive = true
}
Command-Line Usage with AWS CLI (aws s3)
Because Okustera S3 provides standard S3 API compatibility, you can use the official AWS CLI simply by specifying your endpoint URL:
# Set credentials via environment variables
export AWS_ACCESS_KEY_ID="<YOUR_ACCESS_KEY>"
export AWS_SECRET_ACCESS_KEY="<YOUR_SECRET_KEY>"
export AWS_ENDPOINT_URL="https://s3.okustera.com"

# List all buckets
aws s3 ls --endpoint-url https://s3.okustera.com

# Upload a file to bucket
aws s3 cp ./backup.tar.gz s3://company-assets-prod/backups/ --endpoint-url https://s3.okustera.com

# Sync a local directory to an S3 prefix
aws s3 sync ./dist/ s3://company-assets-prod/static/ --endpoint-url https://s3.okustera.com
REST API Reference
GET /api/v1/storage/credentials— List active S3 access keys for the tenant.POST /api/v1/storage/credentials— Generate a new S3 Access Key / Secret Key pair.GET /api/v1/storage/buckets— List S3 buckets in current tenant.POST /api/v1/storage/buckets— Create a new S3 bucket with quota and ACL.DELETE /api/v1/storage/buckets/{name}— Delete an empty bucket.GET /api/v1/storage/buckets/{name}/objects— List objects in bucket with prefix filter.POST /api/v1/storage/buckets/{name}/objects/presign— Generate temporary presigned download/upload URL.DELETE /api/v1/storage/buckets/{name}/objects/{key}— Delete an object.